Inexpensive Decor Secret #2
If you've been around here a while, you'll know there's a mini "series" of posts I left dangling a few months ago. It's hanging on to hope over here. In it I introduced my first secret to inexpensive decor and walked you through my thrift shopping finds, with the brazen promise of two more posts. Then, nothing.
Well, the wait is over. Today I'll talk about my second trick to decorating on the cheap: I make stuff. Or at least tweak it, to make it unique or more "my style." This way, when I go shopping, I can look at items that aren't currently beautiful or right for my house and imagine how they could be. My best friend in this department is spray paint. I've transformed picture frames, candlesticks and baskets. My other secret weapons is scrapbook paper.
In my smaller city, it can be hard to come by trendy prints. Most of the current fabric has to be special ordered then there's Nate Berkus' line at Target. Both options are a wee bit pricey for a cheapskate like me, but scrapbook paper? It's a dollar a sheet at most! So as I was looking for a way to help this situation...
...I did gaze longingly at these...
...which seemed to average 15.99 a pop. Sheesh. But that's okay because I had some ideas of my own.
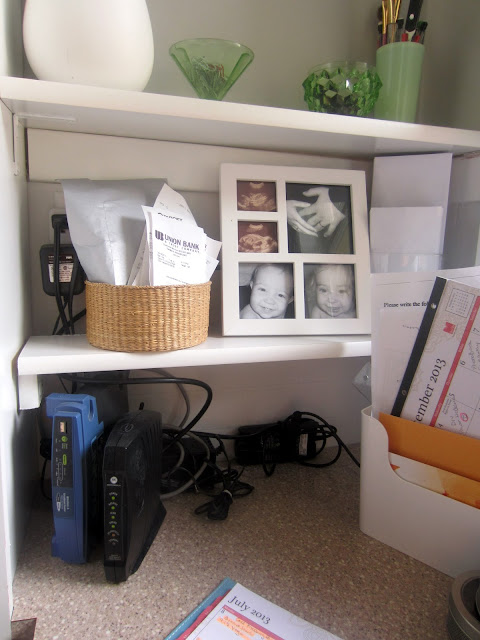
I measured and found out a photo box (which are harder to find these days, so go to Hobby Lobby if you want one) fits over my snarl of ugliness if I lay it on its side. All I had to do was find a pretty one or modge podge scrap paper onto one.
After seeing lots of hot pink, black and animal print photo boxes, option two looked pretty good. I found a white one and scrap paper that would be a nice match to my lime green timer from Anthropologie.

Here's a list of what I used:
Step1 I cut the paper to size and used my homemade Modge Podge to attach it to the bottom of the photo box (which will be the front side of my cord-snarl-hider). I coated the box with the Modge Podge and laid the paper on it, smoothing from the center to the edges.
Step2 I coated the top of the paper with more Modge Podge, going over it until there were no large glue lines or bubbles. I used my thumb to go around the edges where there's a tiny slope and pressed the paper down into it. I did this from the center of each side out.
Step3 I have no idea what the needs of my router or the other thinga-mabob are, but I thought being machines, they might get hot and that might be bad. So I decided to provide them some ventilation and avoid defending myself to the Cable guy who would likely wonder why I was roasting his little machines in a pretty box. I dreamed of some pretty, uniform holes and then I went with the garage door look (below). That was also the original location of the label holder, which I wanted to move. So I pried it off and examined it.
Step4 I used a paper piercer to poke holes onto the new "front" of the box and pushed the poky attachers into them. It doesn't look perfect, but the little label holder makes it look finished. If you don't have a paper piercer, I wouldn't hesitate to get one, because I've found it to be a useful tool outside the scrap-booking world. I've used it to punch new holes in belts and watches. I've used it to punch holes in origami birds so I could string them up with fish line.
And now it's, move-in time! Say goodbye, Uglies. Your time is done.
Which reminds me to tell you, this is one fast project. Except the drying time, but it can do that after you're finished and it's all set up. It's so worth the little time it takes to get this kind of improvement:
I rest my case. Oh, and you see how I used the top of the photo box to make it look even more like a "real" box? I just set it on, because it fit pretty snugly, but you could hot glue it on. Hope you're winning the battle with your ugly cords. It is the bane of a decorator's existence and I've duct taped my share. If it's never occurred to you, look around and see if there are dark cords hanging down where you can see them behind furniture and tape them up. You might be surprised how peaceful it feels to get them out of sight. :)
Well, the wait is over. Today I'll talk about my second trick to decorating on the cheap: I make stuff. Or at least tweak it, to make it unique or more "my style." This way, when I go shopping, I can look at items that aren't currently beautiful or right for my house and imagine how they could be. My best friend in this department is spray paint. I've transformed picture frames, candlesticks and baskets. My other secret weapons is scrapbook paper.
In my smaller city, it can be hard to come by trendy prints. Most of the current fabric has to be special ordered then there's Nate Berkus' line at Target. Both options are a wee bit pricey for a cheapskate like me, but scrapbook paper? It's a dollar a sheet at most! So as I was looking for a way to help this situation...
 |
| This is in my kitchen - see the rest over here... |
...I did gaze longingly at these...
...which seemed to average 15.99 a pop. Sheesh. But that's okay because I had some ideas of my own.
I measured and found out a photo box (which are harder to find these days, so go to Hobby Lobby if you want one) fits over my snarl of ugliness if I lay it on its side. All I had to do was find a pretty one or modge podge scrap paper onto one.
After seeing lots of hot pink, black and animal print photo boxes, option two looked pretty good. I found a white one and scrap paper that would be a nice match to my lime green timer from Anthropologie.

Here's a list of what I used:
- Scissors
- Photo box
- 12x12 sheet of scrap paper
- Foam brush
- Modge Podge
- Paper piercer (shown left - a scrapping tool)
Step1 I cut the paper to size and used my homemade Modge Podge to attach it to the bottom of the photo box (which will be the front side of my cord-snarl-hider). I coated the box with the Modge Podge and laid the paper on it, smoothing from the center to the edges.
Step2 I coated the top of the paper with more Modge Podge, going over it until there were no large glue lines or bubbles. I used my thumb to go around the edges where there's a tiny slope and pressed the paper down into it. I did this from the center of each side out.
Step3 I have no idea what the needs of my router or the other thinga-mabob are, but I thought being machines, they might get hot and that might be bad. So I decided to provide them some ventilation and avoid defending myself to the Cable guy who would likely wonder why I was roasting his little machines in a pretty box. I dreamed of some pretty, uniform holes and then I went with the garage door look (below). That was also the original location of the label holder, which I wanted to move. So I pried it off and examined it.
Step4 I used a paper piercer to poke holes onto the new "front" of the box and pushed the poky attachers into them. It doesn't look perfect, but the little label holder makes it look finished. If you don't have a paper piercer, I wouldn't hesitate to get one, because I've found it to be a useful tool outside the scrap-booking world. I've used it to punch new holes in belts and watches. I've used it to punch holes in origami birds so I could string them up with fish line.
And now it's, move-in time! Say goodbye, Uglies. Your time is done.
Which reminds me to tell you, this is one fast project. Except the drying time, but it can do that after you're finished and it's all set up. It's so worth the little time it takes to get this kind of improvement:
I rest my case. Oh, and you see how I used the top of the photo box to make it look even more like a "real" box? I just set it on, because it fit pretty snugly, but you could hot glue it on. Hope you're winning the battle with your ugly cords. It is the bane of a decorator's existence and I've duct taped my share. If it's never occurred to you, look around and see if there are dark cords hanging down where you can see them behind furniture and tape them up. You might be surprised how peaceful it feels to get them out of sight. :)


that's such a great (& good looking) idea! Well done!
ReplyDelete