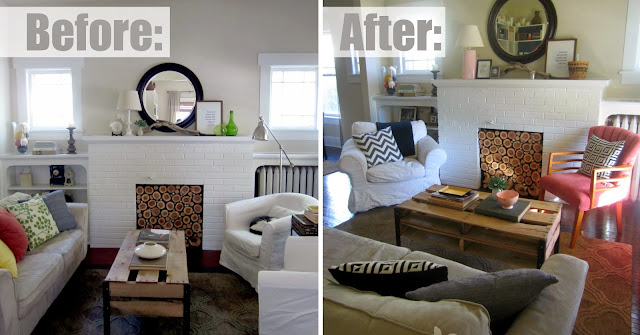
$20 Room Makeover
 |
| (see more of this room here) |
For three years, I've been frustrated with one thing about my small city's shopping options: the lack of pillow slipcovers. Target once sold a few on an end cap and I thought the day had finally come. But after I bought some, they disappeared and they haven't had any since. Then I saw a section of them at Bed Bath and Beyond, but the selection went from traditional to more traditional. All muted, muddy colors, no graphic prints - no help at all.
After announcing to Brian that I was out of love with my pillows, I was drawn into Hobby Lobby on a fragile hope I could make this redo happen for next to nothing. I looked at fabrics because I figured the only way to change my pillows cheaply would be to sew new covers. When I didn't find any fabric I loved, I headed down the aisle with curtains and next to them, do you know what I saw?
Rows and rows of pillow slipcovers. I stepped closer and saw wonderful prints in on-trend colors. I looked to see how they were made - with invisible zippers. I looked to see how they were priced and my heart almost exploded. They ranged from 5.99 to 11.99, based on their complexity. The one pictured below, which was black with off-white stitching that creates the print, was only 7.99. And the reason I was so excited? I could use my 40% off coupon to make them even less. Since I had Chandler and Cadence with me (you can use a coupon per person) I could get three pillow covers for about $15. Right here, in Lincoln, Nebraska. Someone pinch me!
With the pillows changed, I had a lovely neutral backdrop for my pink accents, except I didn't have many. Because I liked this lamp the least, it was nominated to try on some pink. The "ballet slipper" paint was left over from a baby shower project, so it was free. I taped the top of the cord so I wouldn't paint it and covered the hardware too. This took LOTS of thin coats. Because it dries quickly, I was able to go around and around, continuously spraying. The blue was stubborn and kept showing through. Actually, it still does a tiny bit, but I'm satisfied.
Spray painting feels like a shortcut but when you're trying to slow down and do it right, it can feel long. I highly recommend this little tool to make your spray painting days happier. It keeps you from cramping and getting paint on your trigger finger.
The other project that really added some fun to this room (and I took pictures of) was the Dotty Pink Bowl. She was pretty basic to start out with a little reddish-brown "distressing" on the rim.
So I got out some all-surface Martha Stewart paint, a couple Q-tips and a foam brush. This was some real trial and error. I was inspired by a bowl that wore its dots on the inside and tried that, but when I looked into the bowl, it just seemed like it had the measles. It was weird. So I moved the dots to the outside. I formed them by dipping my Q-tip in the paint and then pressing it on the bowl. Those dots didn't seem big enough to me so I made them bigger by sort of spreading the paint around in a circle. The reason this isn't super stressful is you can easily wipe anything off that's horrible (while it's still wet) and the dots are supposed to be irregular and "hand-painted" looking.
Next I attempted to add a gold base. I wanted just a little more gold, but it wasn't meant to be. Alas, Martha Stewart's paint couldn't hold on this slick surface enough for me to add a second coat, which it needed. The first coat would pull off when I brushed the second on.
See? It really needed a second coat. Oh, well. I wiped it all way and went back to the top of the bowl, where I used the foam brush to lightly brush outward on the rim. It covered up the slightly country reddish-brown with some up-town shine.
Also, hand-painted is the basket I snatched from my family room and painted a pattern in black on it. I'd seen some like this around and on Pinterest, so I bought some black paint on the same trip to Hobby Lobby. (That's what got me closer to $20 for the redo.) I don't have any during-the-process photos (sorry) but it's not easy to take your own action shots.
There was no genius behind the pattern I painted, but you can do more if you want more color or less. A more subtle look would be to just do the little pairs all over. (Like I did at the bottom of the basket.) I counted "four over and four down" to get a uniform look. What you need to know upfront is, baskets are made in a spiral, so you'll have a seam that doesn't match up in the back. Mine looked like this:
Not super awesome, but hopefully you're not using it as a centerpiece. Up on my mantle, no one ever sees this part. And relax about the occasional miss (I obviously did). When you step back, it looks pretty perfect, considering.
So there you go. I came through with the promised how-to and I'll throw in that necklace how-to in the near future. After all, at this time of year, it could even become a Christmas present. How was your holiday? I hope you were able to down-shift for a few days, or at least one of them.


Comments
Post a Comment